Part 2: How to Recover Lost iPhone Data after iOS 9 Upgrade
Part 3: More related articles

---------------------------------------------------------------------------------------------------------------------------------------------

Something about iOS 9
Apple hasn't skipped a beat with its annual iPhone and iPad updates, so there's little doubt that it'll be called iOS 9 and launch in tandem with the new iPhone.But that's months away. iOS 9 is likely to be previewed well before the iPhone 6S unveiling, specifically at this summer's World Wide Developer's Conference. iOS 9 is due to take center stage at WWDC 2015 with feature announcements and, of course, a beta made available to anyone with an Apple developer account.Here's what we know so far about iOS 9 and what we're hoping to see in a few months times.
iOS 9 release date
Apple has confirmed the dates for its Worldwide Developers Conference in San Francisco where we're expecting to see iOS 9 shown to the public for the very first time.
The event will take place at the Moscone Center between June 8 and June 12 this year with rumours suggesting Apple will also be debuting its Beats music streaming service at the event as well.From there we can fully expect registered Apple developers to get their hands on the iOS 9 beta soon after. We expect the rest of the public will have to wait until September this year to download it again as the company has done in the past.That three-month wait can be a good thing. iOS 9 beta 1 will be buggy and unfinished. The best features typically don't launch until the gold master version in September anyway.
---------------------------------------------------------------------------------------------------------------------------------------------

How to Recover Lost iPhone Data after iOS 9 Upgrade
“I’ve had my iPhone 6 for about one year and when I connected the iPhone 6 to my computer today I was prompted to update to iOS 9, so I did. But somehow I didn’t realise that it may erase all iPhone data after ios update,I never back iPhone to iTunes or computer… having failed to remember it after a few attempts I simply left iTunes to get some troubleshooting advice. When I got back it seems that the password prompt had disappeared and my iPhone seems to be back to its original settings.After update iPhone to ios 9,it cause lost all data,I can’t found any contents any more.How can I restore the data that was on the iPhone after ios update 9?”–Ask by Yube in apple discussions
“After upgrading the iPone 5S from a previous iOS version to iOS 8,and I need to have iPad data and settings back, directly after updating iPhone to iOS 8. However, even a well-engineered upgrade can sometimes fail and may lead to data loss.Is it possibile to restore iPhone after update to iOS 8?”–Ask by Tomik in iPad discussions.

It is important to take time and back up iPhone, iPad data and settings right before upgrading. If for any reason you do not have backed data after upgrading to the new iOS, it may cause lost data. As we discovered,you still have chane to recover lost data from iPhone and iPad after iOS update.
To recover iPhone iPad data after updating to iOS 8 or iOS 9,you can use this iPhone iPad Data Recovery or iPhone iPad Recovery for Mac,both allows you restore iPhone lost data after ios update,as well as iPad and iPod.You can use this iOS Data Recovery to restore your lost files after upgrading your iPad,iPhone to iOS 8 or iOS 9 by extracting the iTunes backup. In addition, the data recovery software can help you to recover lost contacts, text messages, photos, videos, notes,ect from iPhone, iPad directly.
Now, you can download the trail version for free and have a try:
Free download and install it on your Computer below. This free trial version allows you to extract and preview all the iPhone content in details.
Recover lost data from iPhone, iPad and iPod in two different modes: "Recover from iOS Devices directly" and "Recover from iTunes Backup Files".Next is the use guide teach you how to recover lost files from iOS device:
Step 1: Select the File Types You Need to Recover
Launch the iMyFone D-Back after downloading it. From the "Smart Recovery" tab, click the button "Start".

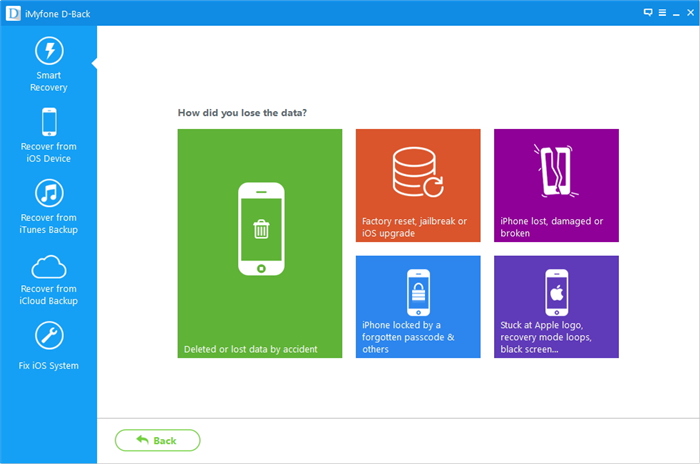
Step 2: Choose How You Lost the Files
Next, you need to choose the situation on how you lost your data for subsequent scan and recovery.
Step 3: Scan and Recover Your Lost iPhone Files
Next, all scan and search work will be completed by the iPhone recovery software itself. iMyFone D-Back can analyze and recover your data from iOS device, iTunes backup or iCloud backup. The following procedures are similar to "recovery from iOS Device/iTunes Backup/iCloud Backup" tabs. With a few easy steps, you can get your lost iPhone data back.
If you know for sure where you could find the data, you can also start scanning from iOS Device/iTunes Backup/iCloud Backup tabs respectively. Please read the specific instructions for your reference.
Step 1: Connect and Scan Your iOS Device
After launching the data recovery software for iPhone, start at the "Recover from iOS Device" tab. Click on "Start".

Now, select the types of files that you would like restore. You will then be asked to connect your iOS device to the computer.

As soon as the program successfully detects your iDevice, click "Scan" to find the file you need.

Step 2: Preview and Recover Data from iPhone/iPad/iPod touch
After the scan is finished, all recoverable data will be clearly organized as the picture below shows. Click each tab to check all files, or only preview the deleted items by choosing "Show only the deleted files". Select the files which you want to recover, and then click "Recover" at the right bottom corner.

A pop-up window will display to let you choose the location to store the recovered files and it will take only a few minutes to finish the recovery.
Step 1: Choose and Scan from iTunes Backup
Click "Start" from the "Recover from iTunes Backup" tab.

Select the file types you need.

Then choose the exact iTunes backup from which you want to recover data and click "Scan". Please wait a moment while it scans.

Step 2: Preview and Recover Data from iTunes Backup
The search results will be showed on the interface clearly. Browse them according to your needs: or "Only show the deleted files", and select the exact ones you need. Then click "Recover".

You need to select or create a folder as the recovery path. Then iMyFone D-Back will recover the data to the folder and you can check it after finishing the recovery process .
Step 1: Log in iCloud Account and Download Your iCloud Backup
Click "Start" at the "Recover from iCloud Backup" tab.

Select the files you wish to recover.

Fill in your iCloud account details. Please be assured that iMyFone will never keep a record of your iCloud account info or content.

The program will find all iCloud backup files in your account; then, select the iCloud backup you would like to recover data from. Click "Next" on the lower right corner. It will take a few minutes for iMyFone D-Back to download your iCloud backup files.

Step 2: Preview and Recover Data from iCloud Backup
After the scan is completed, the search results will be clearly organized on the interface. Preview and choose the files which you want, and then click Recover.

Last, choose a location on your computer to store the recovered data. Please wait while iMyFone D-Back is recovering your lost data.
Congratulations! Your files have been successfully recovered.
iMyFone D-Back has just added a brand new feature known as “Fix iOS System”. This solution is tailor made for someone whose iOS device is stuck on the black screen, white screen, Apple Logo or even in the recovery mode or any looping issues . The beauty of this feature is that you do not have to worry about losing any data when using it to fix your system. Just follow these simple steps and have a first-hand experience of what it is capable of:
Step 1: Choose the Fix iOS System feature
Launch the iMyFone D-Back on your computer and click on "Fix iOS System" from the main window.

Then connect your iOS device using a USB cable. Once your device is detected, click on “Start” and continue.

Step 2: Select and Download Firmware
For a malfunctioning OS, you will have to download new firmware. The cool thing with D-Back is that it will detect your device automatically and let you download the latest OS version suited for it. You just need to click on “Download” and you are good to go!

It will take some time to download the firmware. Please wait for a moment.

Step 3: Fix Your iOS System to Normal
Once the firmware is downloaded, D-Back will start repairing the device and getting it off the loop hitches that gave you headaches.

Now, in a matter of minutes, your device will restart and boot back to normal.

Note:
1. Your device will be updated to the latest iOS version after using this function;
2. Any Jailbroken device will be restored to the default mode after using this function;
3. If your device is locked, it will be unlocked after using this function;